
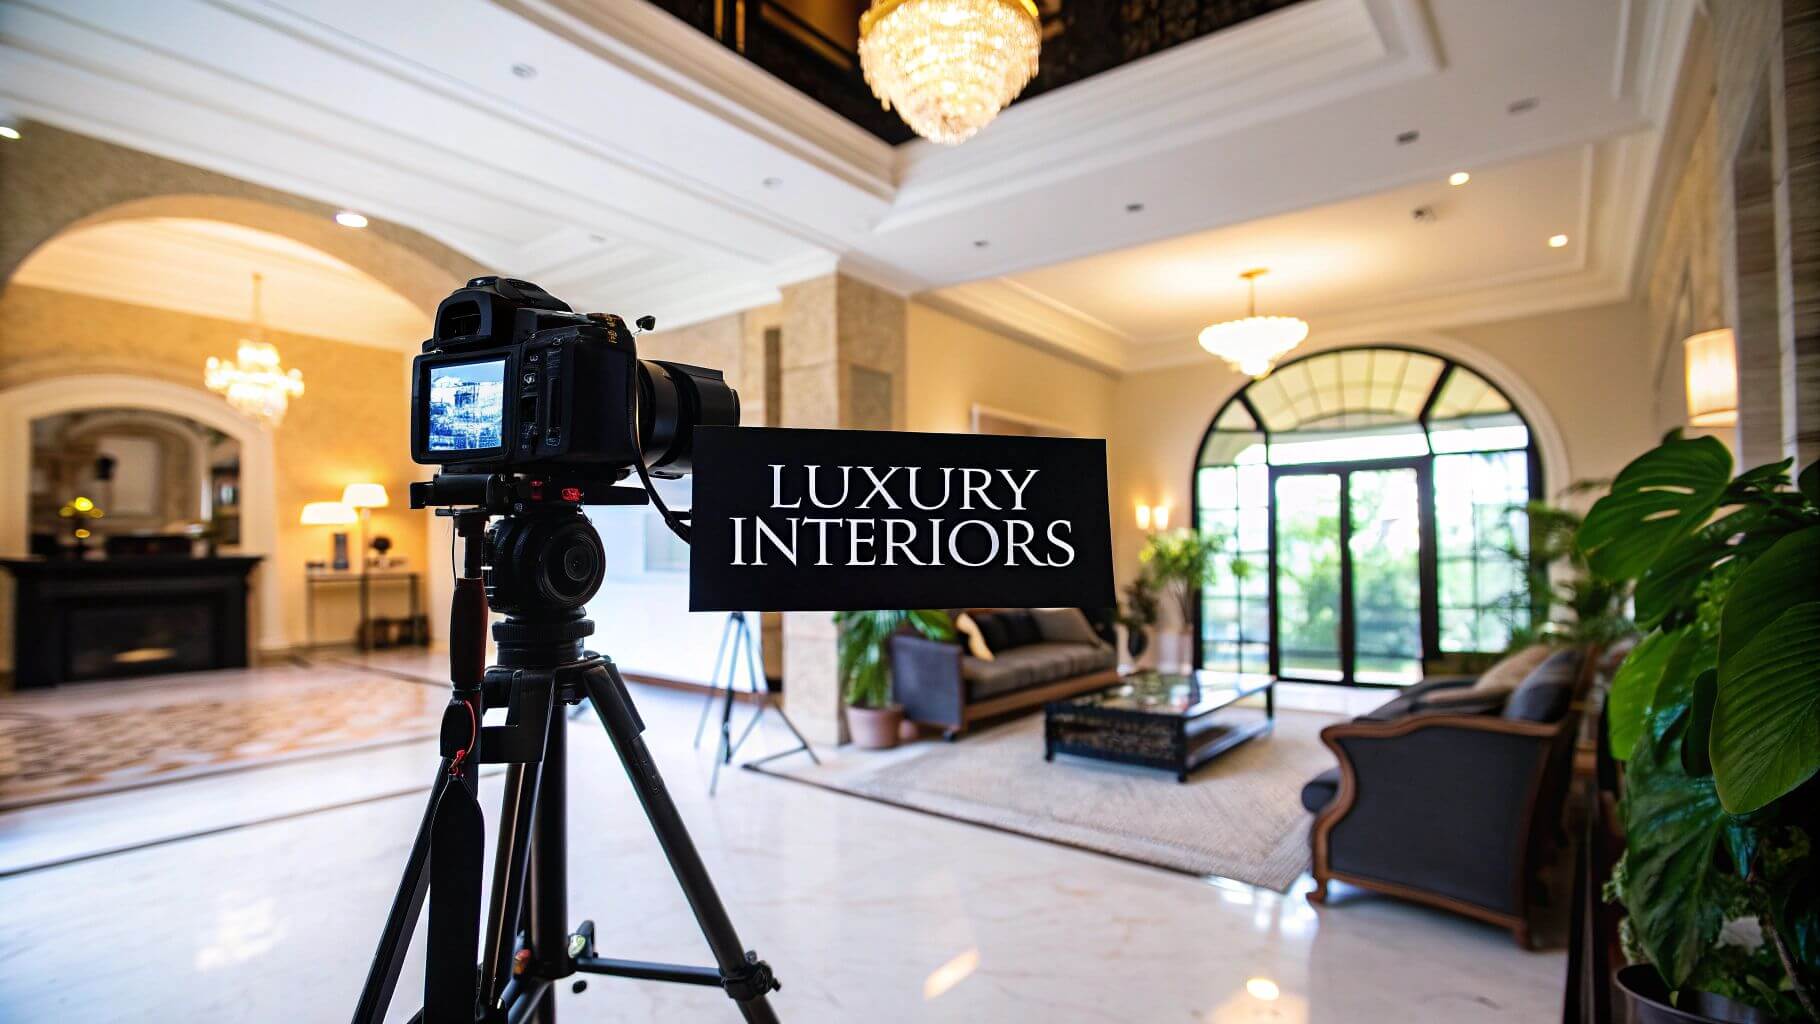
In the world of luxury interiors, a picture is worth more than a thousand words; it’s a direct reflection of your brand and a powerful client acquisition tool. Professional photography is the ultimate medium for showcasing the meticulous detail, thoughtful design, and emotional resonance of a well-crafted space. For premier designers, architects, and builders, capturing the true essence of their work is non-negotiable.
However, interior photography presents a unique set of challenges, from managing complex lighting and tight spaces to controlling reflections on polished surfaces. Moving beyond simple snapshots to create compelling, portfolio-worthy images requires a sophisticated blend of technical skill and artistic vision. This guide provides eight professional interior design photography tips, offering the actionable insights needed to transform your images from mere documentation into art.
These techniques are designed to elevate your portfolio, attract high-net-worth clients, and do justice to your exceptional designs. Whether you are a designer shooting your own projects or a photographer aiming to specialize in luxury interiors, mastering these expert methods will provide a clear roadmap to capturing perfection. You will learn the specific camera settings, compositional rules, and post-production workflows that define high-end architectural and design photography.
1. Master Natural and Artificial Lighting Balance
The art of luxury interior photography lies in faithfully capturing the ambiance of a space. One of the most critical skills to achieve this is mastering the delicate balance between natural daylight pouring through windows and the artificial light sources within the room. This technique, a cornerstone of professional interior design photography tips, ensures every part of the frame is perfectly exposed, from the bright view outside to the soft glow of a table lamp.
This method avoids the common pitfalls of blown-out highlights in windows or dark, muddy shadows in corners. As seen in publications like Architectural Digest, the goal is to create an image that feels both authentic and elevated, showcasing the design as the human eye would perceive it, but with flawless clarity and color fidelity.
How to Achieve a Professional Lighting Blend
To execute this, photographers often employ a technique known as “flambient,” a term popularized by architectural photographer Mike Kelley. This involves blending multiple exposures: one for the ambient (natural) light, one for the flash-lit interior, and often a separate shot for the window view.
- Turn on all interior lights. This establishes the base layer of warmth and showcases the designer’s lighting scheme.
- Bracket your exposures. Take a series of shots (typically 3-7) at different shutter speeds. This captures detail in the darkest shadows, mid-tones, and brightest highlights, which will be merged in post-production.
- Use CTO gels on your flash. To make your flash’s cooler light match the warm hue of tungsten or LED bulbs, place a Color Temperature Orange (CTO) gel over it. This creates a cohesive color palette.
- Shoot during twilight. The “magic hour” just after sunset or before sunrise provides a brief window where exterior and interior light levels are naturally similar, simplifying the balancing act.
The following infographic illustrates the fundamental workflow for balancing these light sources in-camera and during post-processing.
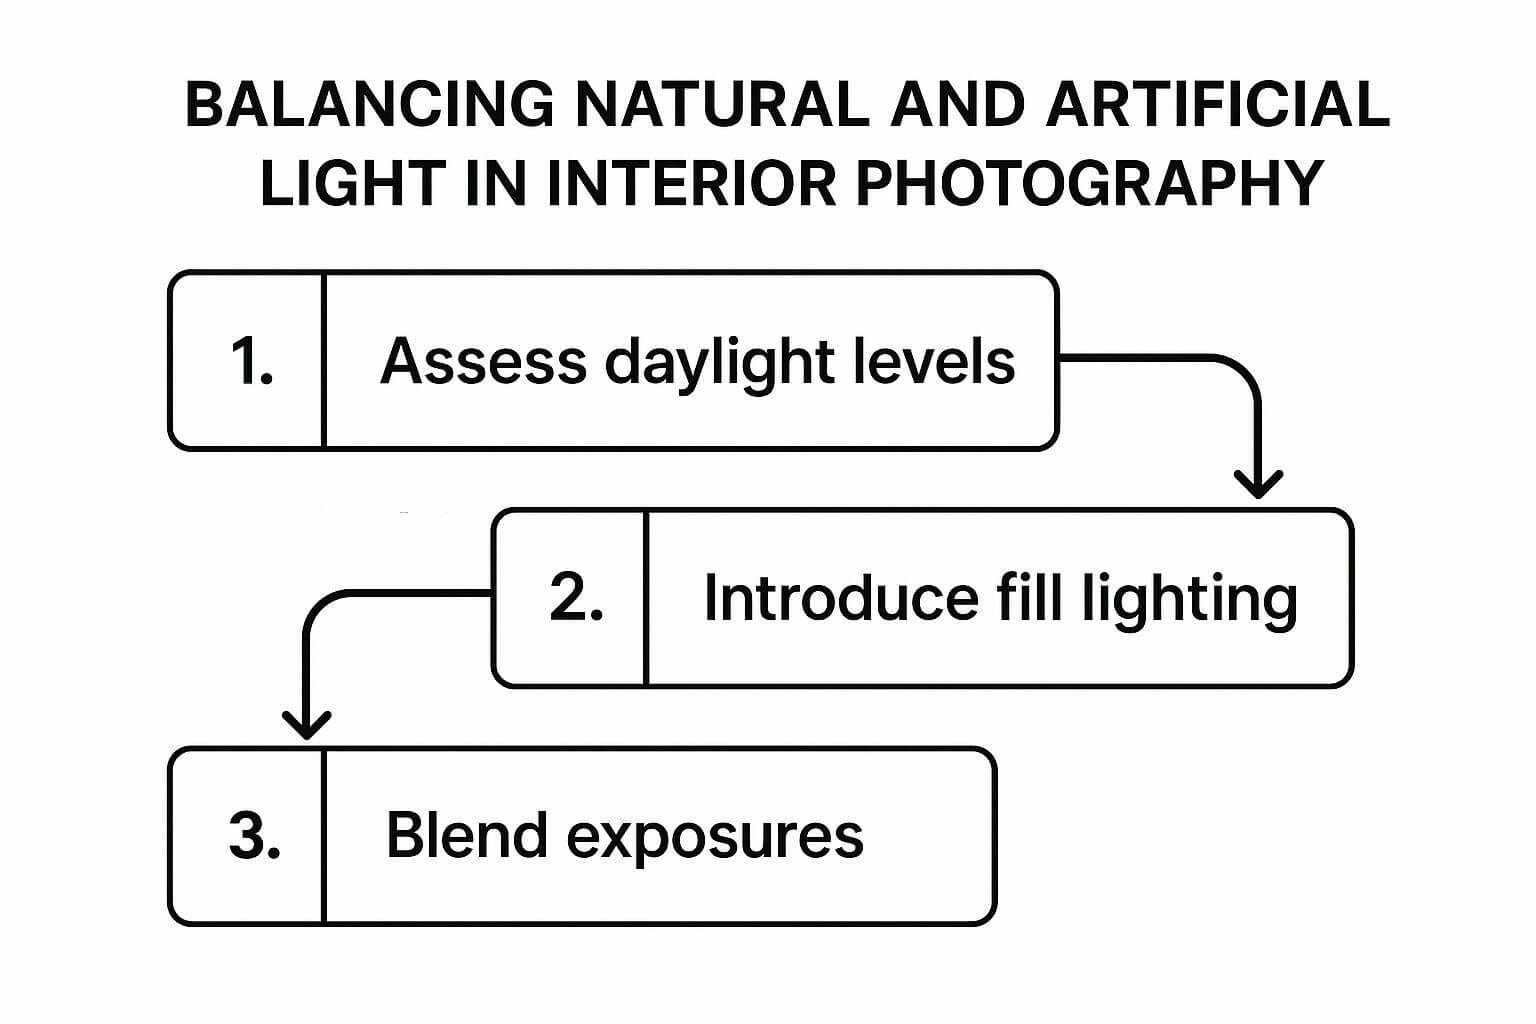
This step-by-step process ensures a controlled and repeatable method for producing perfectly lit interior images. For a deeper, visual demonstration of these lighting principles in action, the video below offers expert insights.https://www.youtube.com/embed/RblEbqypl80
2. Use a Wide-Angle Lens (16-24mm) with Proper Perspective Control
Capturing the full scope and scale of an interior space is a fundamental challenge in design photography. Wide-angle lenses, typically in the 16-24mm focal range, are indispensable tools for this task, allowing photographers to showcase an entire room even from tight corners. The mastery of this technique, however, lies not just in going wide, but in controlling the perspective distortion that these lenses can introduce.
This skill is crucial for producing images with straight, true vertical lines, a hallmark of professional architectural and interior photography. As demonstrated in the portfolio of luxury realtors like Sotheby’s International Realty or in the pages of Dwell Magazine, correct perspective conveys a sense of stability, precision, and architectural integrity, presenting the designer’s work accurately and without distracting distortions.
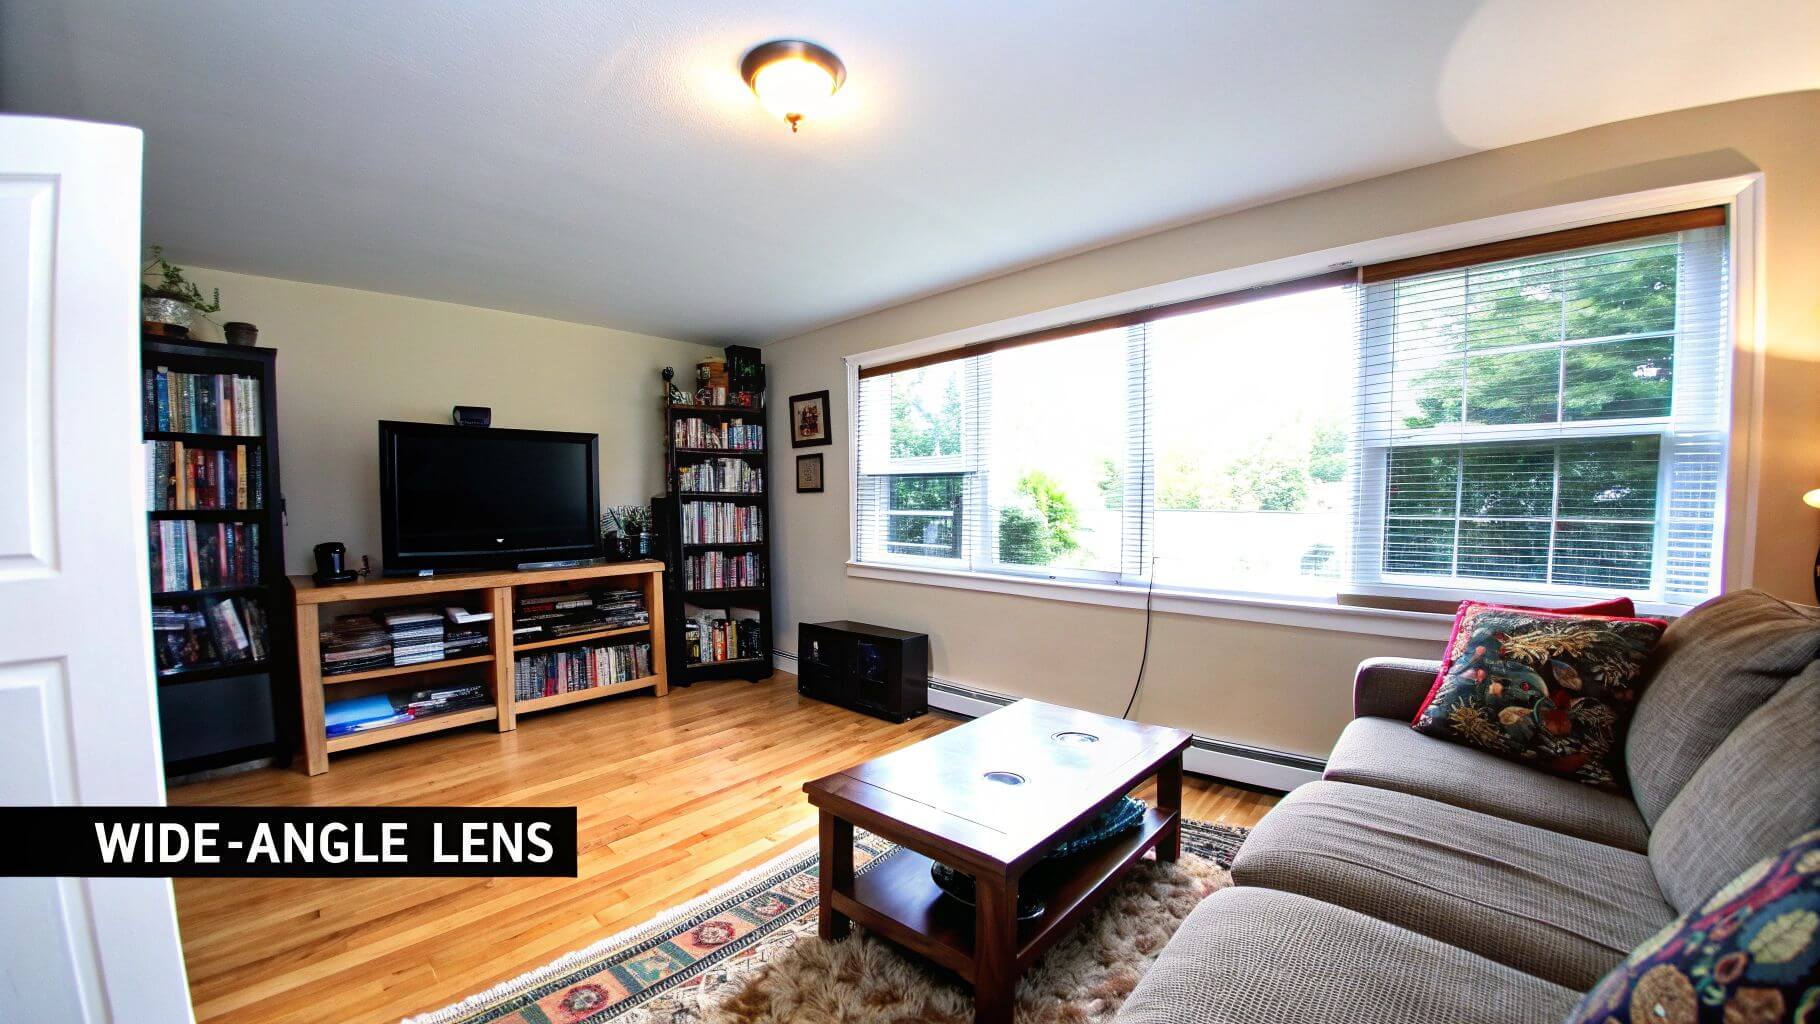
How to Manage Wide-Angle Perspective
Achieving clean, professional lines with a wide lens requires a methodical approach both in-camera and during post-processing. The primary goal is to prevent vertical lines, such as walls and doorways, from converging or appearing to fall backward.
- Keep the camera perfectly level. Use a tripod equipped with a bubble level or your camera’s internal electronic level. The sensor must be parallel to the walls to minimize keystoning, which is the technical term for perspective distortion.
- Shoot at the right height. A common professional practice is to position the camera at waist or doorknob height (around 3-4 feet). This provides a natural, human-eye viewpoint and prevents ceilings or floors from dominating the frame.
- Avoid the widest extremes. While a 16mm lens captures a vast field of view, it can also unnaturally stretch elements at the edges. Shooting closer to 20-24mm often yields a more balanced and realistic perspective.
- Correct in post-production. Even with careful setup, minor corrections may be needed. Use the Transform panel and Guided Upright tools in Adobe Lightroom or specialized software like DxO ViewPoint to perfect vertical and horizontal lines.
For the highest level of control, professional architectural photographers often invest in tilt-shift lenses. A lens like the Canon 17mm TS-E allows the photographer to shift the lens vertically while keeping the camera body level, capturing tall structures or entire walls without tilting the camera and introducing distortion.
3. Shoot from the Correct Height and Camera Position
The perspective from which a photograph is taken fundamentally alters how a viewer perceives and connects with a space. Choosing the correct camera height and position is one of the most critical interior design photography tips for creating images that feel balanced, immersive, and true to the designer’s vision. The goal is to replicate a natural human viewpoint, making the space feel both accessible and aspirational.
This approach avoids the distorted lines and awkward proportions that come from shooting too high or too low. As seen in the portfolios of premier designers like Kelly Wearstler and publications such as Elle Decor, a carefully selected camera height ensures that the furniture, architecture, and decor are presented in harmonious relation to one another, inviting the viewer to step into the scene.
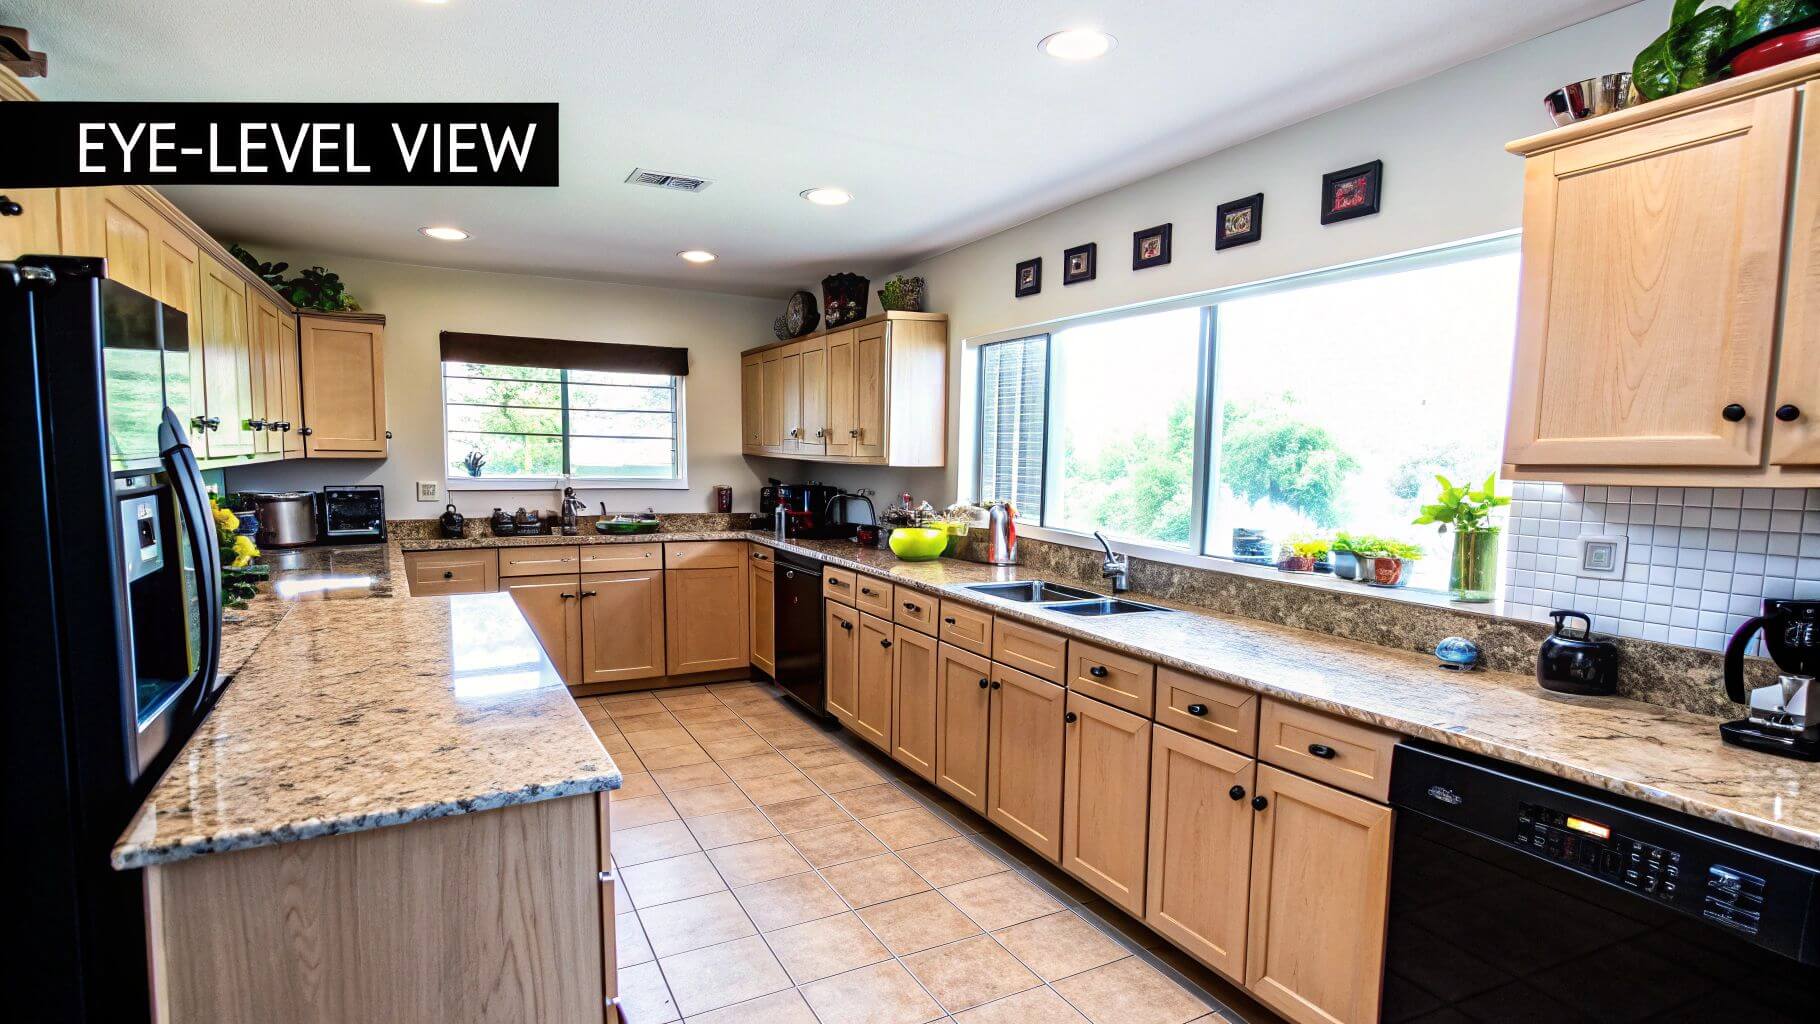
How to Find the Perfect Viewpoint
Standards established by professional organizations like the American Society of Media Photographers (ASMP) recommend a “one-point perspective,” where the camera is level and pointed straight into the room. This technique ensures all vertical lines remain perfectly vertical, which is a hallmark of professional architectural photography.
- Standard Height: Set your tripod to a chest-level height, typically between 4 and 5 feet (48-60 inches). This mimics a natural eye level and provides a familiar, comfortable perspective.
- Adjust for Room Type: Lower the camera to counter height (around 36 inches) in kitchens to emphasize countertops and workspaces. In bedrooms or living rooms, a seated eye level (42-48 inches) can create a more intimate and cozy atmosphere.
- Shoot Through Doorways: Position your camera outside a room and shoot through the doorway. This technique creates a natural frame, adds a sense of discovery, and builds layers of depth in the composition.
- Show at Least Two Walls: To convey the scale and layout of a room, frame your shot to include at least two walls, and often a sliver of the ceiling and floor. Avoid shooting directly into a corner, as it flattens the space.
This strategic camera placement is directly linked to how a space is planned and perceived. For a deeper understanding of how designers lay out rooms for optimal flow and visual appeal, explore this guide to interior design space planning on hauteliving.com. Adhering to these height and positioning guidelines will consistently produce images that are not just beautiful, but also spatially accurate and compositionally sound.
4. Style and Prepare the Space Thoroughly
Professional interior photography is as much about preparation as it is about camera technique. The most technically perfect photograph will fall flat if the space itself is cluttered, unkempt, or lacks personality. Meticulous styling and preparation are foundational interior design photography tips that transform a simple room into an aspirational, story-rich environment. This process involves more than just cleaning; it’s about curating an experience for the viewer.
The goal is to create an image that feels both lived-in and immaculate, showcasing the design’s full potential. Brands like West Elm and Magnolia have perfected this art, presenting spaces that are impeccably styled yet feel welcoming and attainable. This careful curation allows viewers to envision themselves within the home, making the design far more compelling.
How to Professionally Style an Interior Space
Effective styling requires a detail-oriented approach that considers every element within the frame. From furniture placement to the smallest decor item, each choice should be intentional and serve the overall composition. This meticulous process ensures the final images are polished and professional, elevating the perceived value of the design.
- Declutter decisively. Remove all non-essential items like remote controls, visible cords, personal mail, and daily clutter. The focus should be on the architecture and design, not the occupants’ day-to-day life.
- Add layers of texture and life. Introduce elements like fresh flowers or green plants, artfully arranged books, and luxurious throws or pillows. These items add color, warmth, and a sense of sophisticated living.
- Perfect every surface. Ensure all surfaces are spotless and free of dust or smudges. Steam or iron all fabrics, including bedding, curtains, and upholstery, to remove any wrinkles that can distract the eye.
- Create a styling kit. Arrive prepared with a kit of props such as neutral-toned books, elegant vases, high-quality textiles, and a lint roller. This allows you to add finishing touches on-site.
By implementing these steps, you enhance the narrative of the space, ensuring it aligns with a specific aesthetic vision. To create a space that photographs beautifully, it’s essential to understand the principles behind different aesthetics. Learn more about developing a cohesive look with this essential interior design style guide.
5. Master Composition with Leading Lines and Layers
A compelling interior photograph does more than just document a room; it tells a story and guides the viewer’s eye through the space. Mastering composition by using leading lines and creating layers is a fundamental interior design photography tip that transforms a simple shot into a sophisticated, engaging image. This approach uses existing architectural features and furniture to build a visual journey for the observer.
This technique prevents images from appearing flat and one-dimensional. Instead, it adds depth, dimension, and a sense of narrative. Publications like Cereal magazine and architecture platform Dezeen frequently feature photography with strong geometric compositions, where lines and layers work in harmony to highlight the designer’s intent and create a powerful sense of place and perspective.
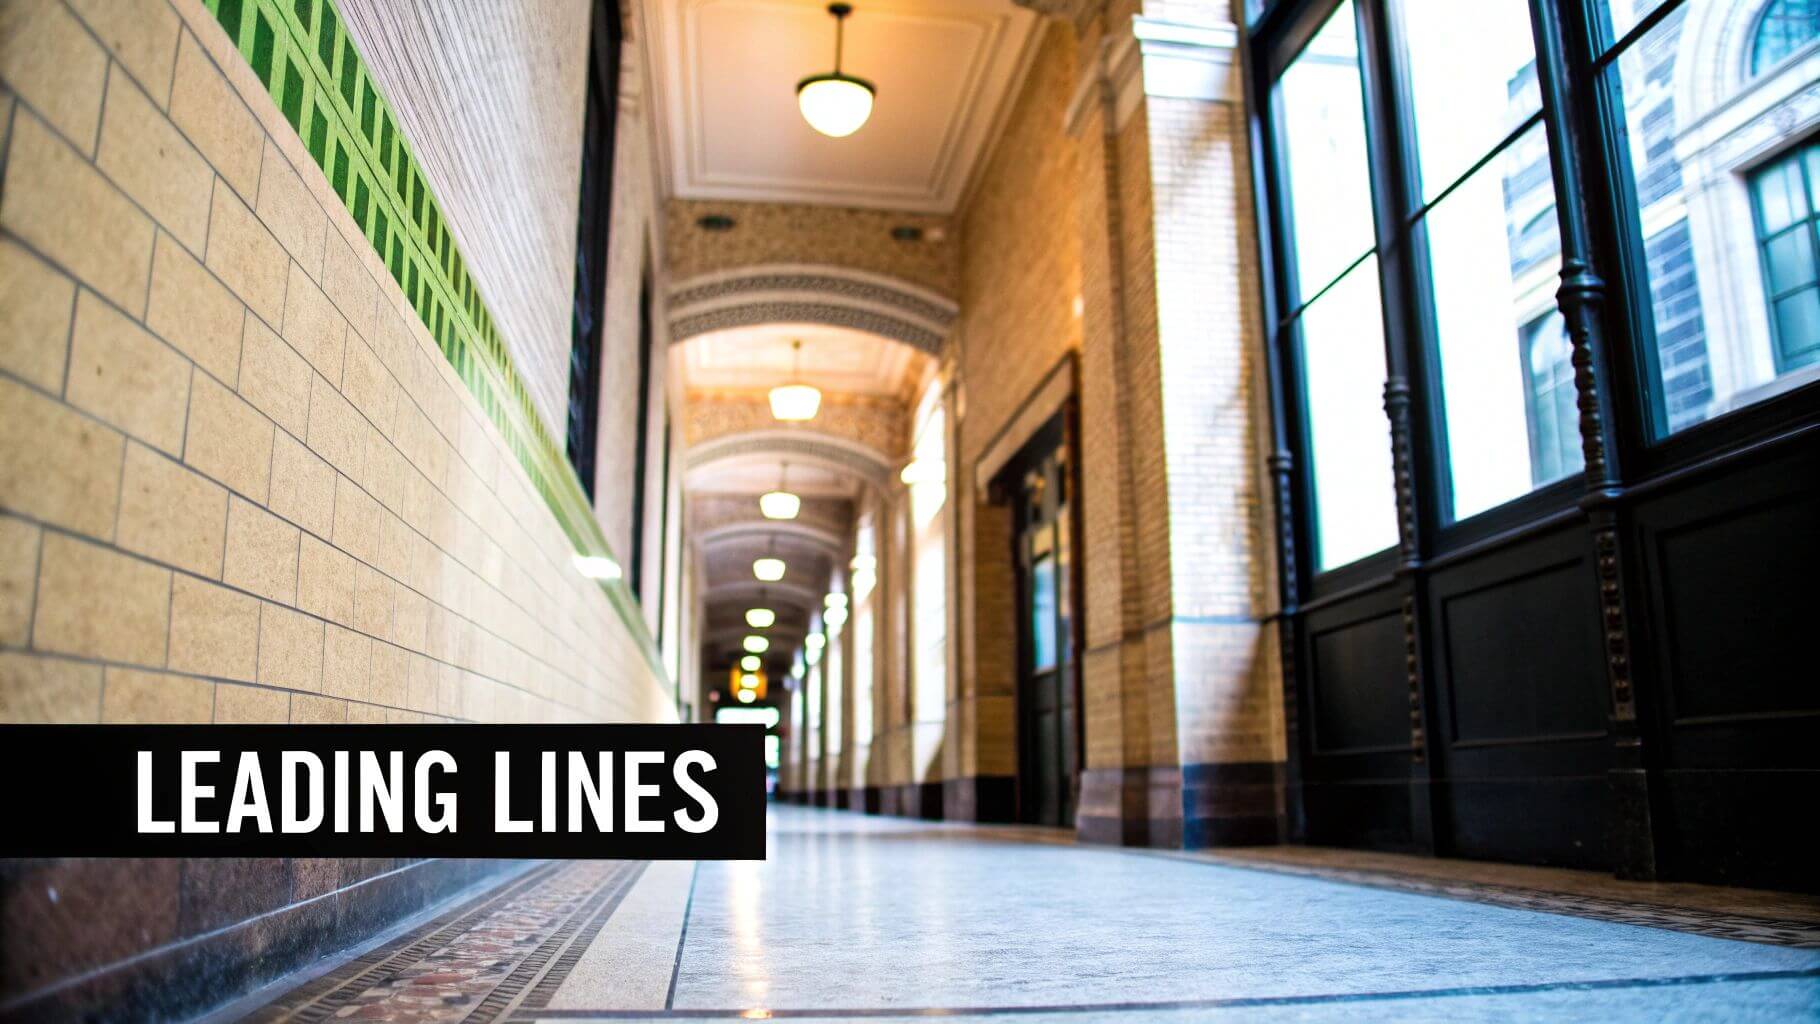
How to Implement Strong Compositional Techniques
Building a well-composed shot requires a deliberate approach to framing and perspective. Photographers like Romain Ricard are known for their sophisticated use of layering. The goal is to draw the viewer into the scene, directing their focus toward key design elements.
- Use architectural elements as leading lines. Position your camera to use hallways, doorways, ceiling beams, or even the edge of a countertop to guide the eye toward a focal point, like a statement piece of furniture or a window with a view.
- Create depth by layering. Frame your shot by including elements in the foreground, middle ground, and background. Shooting through a doorway or placing a plant or chair edge in the near foreground adds instant dimension.
- Apply the rule of thirds. Place the most important elements of the room along the intersections of an imaginary 3×3 grid. This creates a more dynamic and visually pleasing balance than centering the subject.
- Shoot from a corner. Positioning yourself in a corner, often at a 45-degree angle, allows you to capture multiple walls and create a more comprehensive and inviting view of the space.
The following video provides an excellent tutorial on applying compositional rules, such as leading lines and the rule of thirds, specifically within the context of interior photography.https://www.youtube.com/embed/8vRdwK1b6oU
6. Shoot in RAW Format and Master Post-Processing
The final polish that separates amateur snapshots from professional interior photography is achieved through a meticulous post-processing workflow. This process begins in-camera by shooting in RAW format, a fundamental step for capturing the maximum amount of image data directly from the camera’s sensor. Unlike compressed JPEGs, RAW files provide unparalleled flexibility for editing, making them an indispensable part of any list of interior design photography tips.
Shooting in RAW allows for extensive adjustments to exposure, white balance, and color without degrading image quality. This control is essential for correcting color casts, recovering details in bright windows or dark shadows, and achieving the precise color grading seen in luxury publications like Elle Decor. The goal is to refine the image to perfectly match the designer’s vision, creating a final product that is both technically flawless and aesthetically compelling.
How to Implement a Professional Editing Workflow
A disciplined post-processing strategy ensures consistency and quality across a project. It involves more than just basic adjustments; it’s about using powerful software like Adobe Lightroom or Capture One to sculpt the final image. This workflow is standard for high-end commercial work for architects and real estate firms such as Sotheby’s International Realty.
- Always shoot in RAW. This is non-negotiable. It captures the full dynamic range and color information, providing the raw material for a high-quality edit.
- Calibrate your monitor. To ensure your color adjustments are accurate and will translate correctly to print and web, a calibrated monitor is essential.
- Master perspective correction. Use tools like Lightroom’s Transform panel to ensure all vertical lines are perfectly straight, correcting any lens distortion and creating a clean, architectural look.
- Learn exposure blending. For high-contrast scenes, blend multiple exposures (HDR or manual blending in Photoshop) to create a single, perfectly lit image where every detail is visible.
- Develop a consistent style. Create or use presets to apply a consistent color grade and feel across all images from a single project, ensuring a cohesive and professional portfolio.
7. Use a Tripod for Sharpness and Consistency
In professional interior photography, a sturdy tripod is not just an accessory; it is a foundational piece of equipment. Its use is non-negotiable for achieving the tack-sharp images, consistent framing, and creative control that define high-end work. A tripod eliminates camera shake, enabling the use of slower shutter speeds and lower ISO settings for noise-free, highly detailed photographs, which is one of the most fundamental interior design photography tips.
This stability allows for advanced techniques like exposure bracketing, focus stacking, and long exposures, which are essential for capturing the full dynamic range and depth of a meticulously designed space. Professionals from fine art photographers like Todd Hido to every major architectural publication rely on tripods to create a deliberate, precise workflow and ensure every frame is perfectly composed and technically flawless.
How to Maximize Tripod Stability and Precision
Using a tripod is about more than just setting it down; it’s about creating a completely stable platform. Small vibrations can soften an image, so a methodical approach is key to guaranteeing a crisp final product that showcases every detail of the interior design.
- Invest in a quality tripod and head. Choose a sturdy carbon fiber or aluminum tripod with a weight capacity that significantly exceeds your camera and lens combination. A geared head offers the most precise compositional adjustments.
- Utilize a remote shutter or timer. Pressing the shutter button can introduce vibrations. Use a cable release, a wireless remote, or your camera’s built-in 2-second timer to trigger the shot without touching the camera.
- Add weight for stability. In situations where you need maximum stability, hang your camera bag from the tripod’s center column hook. This lowers the center of gravity and dampens potential vibrations.
- Enable mirror lock-up or an electronic shutter. On DSLR cameras, the movement of the mirror can cause a slight vibration. Using mirror lock-up mode solves this. On mirrorless cameras, switching to the electronic shutter achieves a similar, completely silent and vibration-free capture.
By integrating these practices, you create a methodical and repeatable process for capturing technically perfect images. This allows you to focus entirely on composition and lighting, knowing that the sharpness of your shot is guaranteed.
8. Control and Manage Reflections and Window Views
Effectively managing reflections is a defining skill that separates professional interior photographers from amateurs. Glossy surfaces, from glass tabletops and polished floors to mirrors and windows, can create distracting reflections of the photographer, their equipment, or unwanted room elements. Equally important is controlling the view through windows, as blown-out, overexposed panes detract from the luxury feel of a space.
Mastering this aspect of interior design photography tips ensures the final image is clean, immersive, and focuses entirely on the designer’s intent. As seen in high-end real estate features in The New York Times, every surface appears pristine and the relationship between the interior and exterior is seamlessly captured, adding depth and context to the design.
How to Achieve Flawless Surfaces and Views
The process involves a combination of in-camera techniques and strategic positioning to minimize issues before post-production. This proactive approach saves significant editing time and produces a more natural, believable result. It often requires shooting multiple exposures to composite the perfect final image.
- Use a Circular Polarizing Filter (CPL). This is the single most important tool for managing reflections. Rotating the filter allows you to selectively reduce or eliminate glare on non-metallic surfaces like glass, water, and polished wood.
- Shoot from strategic angles. Sometimes, simply changing your camera position by a few inches or feet can completely hide a problematic reflection. Experiment with different heights and angles to find a clean composition.
- Employ black cards or flags. For stubborn reflections of your camera or yourself, position a black, non-reflective card or fabric (known as a flag) just out of frame to block the reflection at its source.
- Bracket for the window view. To capture the detail outside, you will need a much darker exposure than what is required for the interior. Take a separate shot specifically for the view, which can then be blended in during post-production.
- Shoot during the twilight hour. The brief period just before sunrise or after sunset offers a natural balance between interior and exterior light levels, simplifying the process of capturing a perfect window view. This careful consideration of light is also crucial when photographing spaces with intricate window treatments. You can learn more about mastering interior design window treatments on hauteliving.com to better understand how they interact with light and views.
Interior Design Photography Tips Comparison
| Technique | Implementation Complexity 🔄 | Resource Requirements ⚡ | Expected Outcomes 📊 | Ideal Use Cases 💡 | Key Advantages ⭐ |
|---|---|---|---|---|---|
| Master Natural and Artificial Lighting Balance | High 🔄🔄 | High ⚡ (lighting gear, assistants) | Accurate, natural light balance 📊⭐ | Luxury homes, high-end real estate, hotels | Natural look, detailed shadows, color accuracy ⭐ |
| Use a Wide-Angle Lens (16-24mm) | Medium 🔄 | Medium ⚡ (special lenses, tripod) | Spacious interiors, full room capture 📊 | Tight spaces, architectural, real estate, catalogs | Captures entire rooms, professional standard ⭐ |
| Shoot from the Correct Height and Camera Position | Low-Medium 🔄 | Low ⚡ (tripod, measuring tools) | Natural perspective, balanced composition 📊 | Residential, commercial interiors, designer portfolios | Relatable view, reduced distortion ⭐ |
| Style and Prepare the Space Thoroughly | Medium 🔄 | Medium ⚡ (styling props, time) | Aspirational, distraction-free images 📊 | Real estate, catalog, portfolio, editorial shoots | Enhances image appeal, increases perceived value ⭐ |
| Master Composition with Leading Lines and Layers | Medium-High 🔄 | Low ⚡ (time, furniture rearrangement) | Engaging, dimensional photos 📊 | Editorial, high-end architectural interiors | Visual storytelling, professional polish ⭐ |
| Shoot in RAW Format and Master Post-Processing | Medium 🔄 | Medium-High ⚡ (software, hardware) | Maximum image quality, flexible edits 📊 | All professional commercial photography | Extensive correction, highlight/shadow recovery ⭐ |
| Use a Tripod for Sharpness and Consistency | Low 🔄 | Low-Medium ⚡ (tripod gear) | Sharp, consistent images 📊 | Virtually all interior photography | Eliminates shake, precise framing ⭐ |
| Control and Manage Reflections and Window Views | High 🔄🔄 | Medium ⚡ (filters, flags, time) | Clean, professional images with visible exterior views 📊 | Glass-heavy interiors, luxury, high-rise properties | Eliminates distractions, shows window detail ⭐ |
Bringing Your Vision to Light
Mastering the art of interior design photography is not about a single secret but rather the consistent application of refined techniques. Throughout this guide, we’ve explored the critical pillars that transform a simple snapshot into a compelling architectural narrative. From the foundational decision to shoot in RAW to the nuanced control of reflections and window views, each tip serves as a vital tool in your creative arsenal.
The journey from good to exceptional photography lies in the details. It’s about understanding that the precise balance of natural and artificial light can define a room’s mood, and that the strategic use of a 16-24mm lens with perspective control can convey its true scale and grandeur. It’s recognizing that shooting from the correct height, typically around 40 inches, invites the viewer into the space rather than making them feel like a distant observer. These aren’t just technical steps; they are artistic choices that honor the designer’s intent.
From Technical Skill to Visual Storytelling
The most powerful interior images are born from a synthesis of technical precision and thoughtful preparation. Meticulous styling, where every object has a purpose, works in concert with strong compositional principles like leading lines and layering. Using a tripod isn’t just for sharpness; it’s a commitment to consistency and methodical execution, allowing you to build composite images in post-processing that are flawless.
These interior design photography tips are more than a checklist. They represent a holistic approach to capturing the soul of a space. By integrating these practices into your workflow, you elevate your photography from mere documentation to a powerful form of storytelling. Your images will not only showcase a design but will also evoke the feeling of being within it, a quality that resonates deeply with discerning clients and collaborators.
Your Path to Photographic Excellence
The key to progress is incremental and deliberate practice. Don’t feel overwhelmed by the need to implement every strategy at once. Instead, focus on mastering one or two techniques in your next project.
- For your next shoot, concentrate on: Perfecting your camera height and angle for every single composition.
- During your next editing session: Dive deeper into layer masking to flawlessly blend window exposures.
By consistently building upon your skills, you will develop a signature style that not only captures beautiful spaces but also communicates your unique professional value. This investment in your craft is what separates the amateur from the expert, transforming your portfolio into a testament to your design prowess and securing your position at the top of a competitive industry. Your vision deserves to be seen in its best light.
Ready to see how elite designers showcase their work? Explore the curated portfolios on Haute Design, the premier network connecting affluent homeowners with the industry’s top talent. Discover the power of exceptional photography and find your next design inspiration or professional collaborator on the Haute Design network.