

Embarking on a luxury bathroom renovation is an investment in both your property’s value and your daily quality of life. The difference between a seamless, successful project and a costly, prolonged ordeal often lies in meticulous planning. A well-structured process transforms a complex undertaking into a series of manageable, sequential steps, ensuring every detail from structural integrity to aesthetic finish is addressed with precision.
Without a clear roadmap, critical elements like waterproofing, permit acquisition, and plumbing configurations can be overlooked, leading to significant budget overruns, timeline delays, and potential long-term issues.
This comprehensive bathroom renovation checklist is designed to serve as that essential roadmap. It provides a detailed, step-by-step guide for affluent homeowners, designers, and builders navigating the intricacies of a high-end bathroom transformation. We will move beyond generic advice to offer actionable insights and specific implementation details for each critical phase of the project.
From establishing a realistic budget and timeline to navigating the complexities of hiring qualified contractors and ensuring flawless execution of plumbing and electrical systems, this guide covers it all. You will learn how to properly sequence tasks, from foundational waterproofing and flooring installation to the final touches of wall finishes and quality assurance inspections.
Following this structured checklist will empower you to maintain control over your project, mitigate common risks, and achieve a final result that embodies luxury, functionality, and enduring quality. Let’s begin building your dream bathroom.
1. Set Budget and Timeline
Establishing a clear, realistic budget and a well-defined timeline is the foundational first step in any successful bathroom renovation checklist. Before a single tile is chosen or a faucet is selected, these two components will dictate every subsequent decision, from the scope of work to material selection and contractor hiring. Without a firm grasp on finances and scheduling, a project can quickly spiral into overspending and indefinite delays.
Understanding the Financial Scope
Your budget is more than just a single number; it’s a detailed financial plan. Start by researching typical costs in your area for different scales of renovation. A cosmetic refresh might cost around $5,000, while a mid-range remodel with new fixtures and tile could be $15,000–$25,000. For a luxury master bathroom involving layout changes, high-end materials, and custom features, budgets often start at $50,000 and can extend well beyond, spanning 6-8 weeks for completion.
Your budget should be broken down into specific categories:
- Labor: Typically accounts for 40-60% of the total cost.
- Materials: Includes everything from tile and countertops to fixtures and lighting.
- Permits & Fees: Varies by municipality but is a non-negotiable cost.
- Contingency Fund: Crucially, set aside an additional 15-20% of your total budget for unforeseen issues like hidden water damage or structural problems.
This detailed approach transforms an abstract goal into an actionable financial strategy. To visualize the essential components of your project’s financial and time planning, consider this quick reference summary.

This breakdown highlights the critical importance of allocating a significant portion of your funds to labor and maintaining a robust contingency fund to ensure the project stays on track. With your budget defined, you can create a timeline that aligns with contractor availability, material lead times, and your personal schedule, setting a professional tone for the entire renovation process.
2. Design and Layout Planning
Once the budget is set, the next critical step in your bathroom renovation checklist is to meticulously plan the design and layout. This creative phase translates your vision into a functional blueprint, determining the room’s flow, usability, and overall aesthetic. A well-considered layout optimizes every square inch, ensuring that the finished space is not only beautiful but also perfectly tailored to your lifestyle, whether that involves creating a spa-like retreat or an efficient, family-friendly washroom.
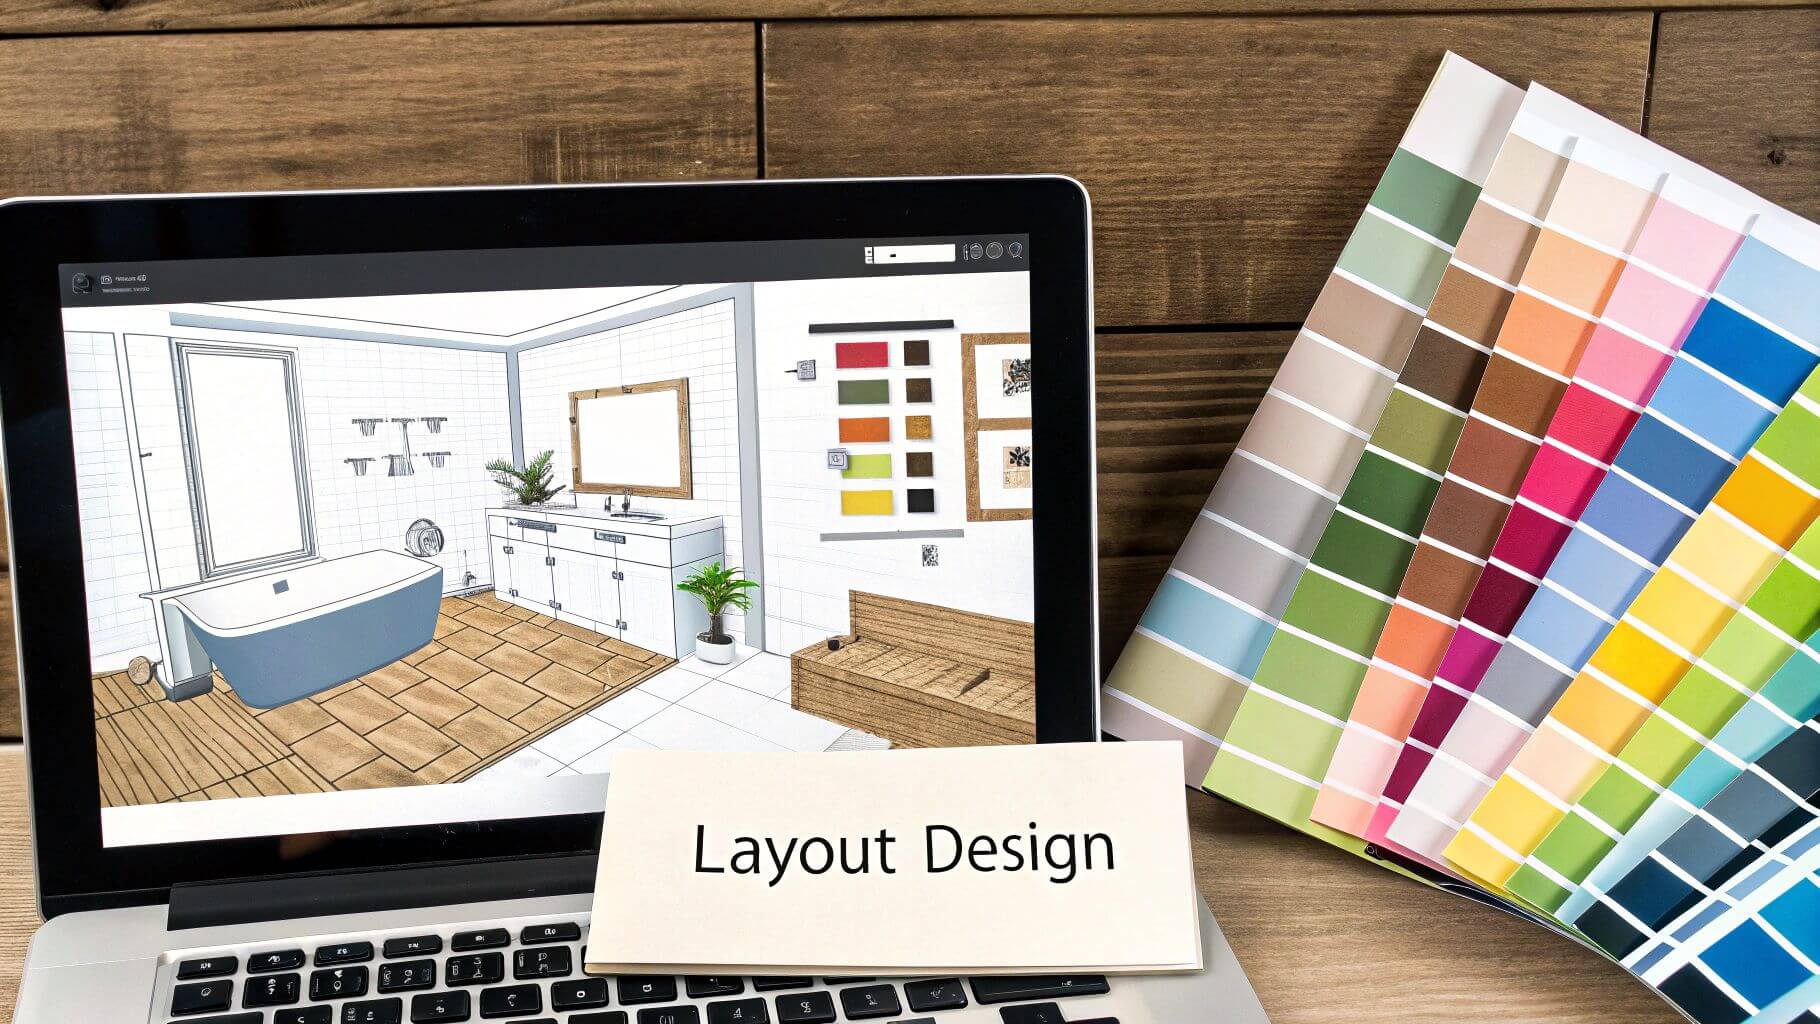
Developing a Cohesive Blueprint
Effective layout planning is the difference between a standard bathroom and a truly luxurious one. Begin by assessing the existing footprint and identifying any constraints or opportunities, such as plumbing stacks or windows. This is the time to decide on major changes, like converting a bathtub into a spacious walk-in shower for aging-in-place or relocating fixtures to create a more intuitive flow. A strategic layout can dramatically enhance the perception of space and functionality.
Your design and layout plan should integrate several key elements:
- Fixture Placement: Consider the classic “work triangle” concept, ensuring the sink, toilet, and shower are placed for optimal ergonomics. For larger master suites, creating separate zones for vanities, the toilet, and the bathing area adds a layer of sophisticated privacy.
- Storage Solutions: Integrate a mix of storage types, such as a vanity with deep drawers, recessed medicine cabinets, and open shelving. Custom millwork can conceal clutter and maintain a sleek, minimalist aesthetic.
- Lighting Scheme: Plan a layered lighting approach. Ambient lighting provides overall illumination, task lighting is crucial at the vanity, and accent lighting can highlight architectural features or art. Dimmers are essential for adjusting the mood from bright and functional to soft and relaxing.
This detailed planning phase ensures that every component works in harmony, preventing costly changes during construction. For a deeper look into a successful renovation strategy, you can learn more about how to plan a home renovation for success. This process solidifies the project’s direction and sets the stage for a seamless execution.
3. Obtain Necessary Permits
Securing the proper building permits is a non-negotiable step in any legitimate bathroom renovation checklist, ensuring your project complies with local building codes, zoning laws, and safety regulations. This formal approval from your local municipality validates your plans and protects your home’s value and structural integrity. Bypassing this crucial stage can lead to significant fines, forced removal of completed work, and serious complications when selling your property in the future.
Understanding the Permitting Process
A permit is more than just paperwork; it’s an essential part of a safe and legal construction process. The requirement for a permit is typically triggered by changes to the home’s structure, plumbing, electrical, or mechanical systems. A simple cosmetic update like painting or replacing a faucet usually doesn’t require one, but more substantial work almost always will. This process provides a system of checks and balances, with official inspections confirming the work is done correctly at critical stages.
Your permit application will generally require detailed plans of the proposed renovation. These plans are reviewed to ensure they meet safety standards. Common triggers for permits in a bathroom renovation include:
- Structural Changes: Moving or removing walls, especially if they are load-bearing.
- Plumbing Reconfiguration: Relocating a toilet, sink, or shower, or adding new plumbing lines.
- Electrical Work: Adding new circuits for lighting, outlets, or a heated floor system.
- Layout Alterations: Changing the footprint of the bathroom in any significant way.
Navigating the permit process is a critical task that ensures your investment is protected. Start by contacting your local building department early in the planning phase to understand their specific requirements and timelines. This proactive approach prevents delays and confirms that every aspect of your renovation is officially documented and approved, providing peace of mind and safeguarding your home’s long-term value.
4. Hire Qualified Contractors
Engaging the right team of professionals is a cornerstone of a successful high-end bathroom renovation. While a DIY approach might seem cost-effective, the complexity of luxury projects involving intricate plumbing, electrical work, and high-value materials demands the precision of experienced, licensed, and insured contractors. This step in your bathroom renovation checklist ensures that your design vision is executed flawlessly, adheres to building codes, and is protected against potential liabilities.
Vetting and Selecting Professionals
The selection process is more than just collecting quotes; it’s about finding a partner who understands your standards for quality and communication. Start by identifying potential candidates, which could be a general contractor to manage the entire project, specialized trades like a master plumber or electrician, or a full-service design-build firm. The key is a rigorous vetting process that safeguards your investment.
Your vetting protocol should include several critical steps:
- Verify Credentials: Always confirm that any potential contractor holds the necessary licenses for your municipality and carries comprehensive liability and workers’ compensation insurance.
- Check References: Move beyond online reviews. Request and contact at least three recent clients to inquire about their experience regarding timeliness, budget adherence, and overall craftsmanship.
- Review Portfolios: Examine past projects to ensure their aesthetic and quality align with your expectations for a luxury bathroom renovation.
- Establish Clear Contracts: The chosen contractor must provide a detailed written contract outlining the scope of work, material specifications, payment schedule, and a clear procedure for handling change orders.
This thorough approach ensures you partner with a professional capable of delivering the exceptional results your project deserves. To find reputable home builders and remodelers in your area, you can learn more about top-tier professionals. Committing to this level of due diligence at the hiring stage is the most effective way to prevent costly mistakes and ensure a smooth, professional renovation experience from start to finish.
5. Address Plumbing and Electrical Systems
Updating or relocating plumbing and electrical systems is often the most complex and critical part of a comprehensive bathroom renovation checklist. Before any walls are closed or finishes are installed, the “rough-in” phase ensures the foundational infrastructure is safe, functional, and up to code. This step dictates fixture placement, lighting capabilities, and the overall performance of your new space, making it a non-negotiable priority for any high-end remodel.
Planning for Functional Infrastructure
The integrity of your bathroom depends on the systems hidden behind the walls. This phase involves mapping out all water supply lines, drains, and electrical circuits to support your new design. For instance, moving a toilet requires relocating the main drain stack, a significant job, while adding a steam shower demands both new plumbing lines and a dedicated, high-amperage electrical circuit. Proper planning here prevents costly post-construction changes and future system failures.
This crucial work must be meticulously planned and executed by licensed professionals:
- Plumbing: This includes rerouting pipes for a new vanity location, installing a new shower valve system, or moving the main soil stack. It’s also the ideal time to upgrade old galvanized pipes to copper or PEX.
- Electrical: Work can range from installing dedicated 20-amp GFCI circuits for heated floors and towel warmers to adding recessed lighting, vanity sconces, and waterproof in-shower lighting.
- Ventilation: Proper ventilation is key to preventing moisture and mold. This step involves installing a high-capacity, quiet exhaust fan ducted directly to the outside, not just into an attic space.
Engaging certified plumbers and electricians early in the process ensures that your design ambitions are feasible and meet all local building codes. This professional oversight is essential for safety, functionality, and passing required inspections, solidifying the long-term value and reliability of your investment.
6. Waterproofing and Moisture Control
Proper waterproofing and moisture control are non-negotiable elements in any high-end bathroom renovation checklist. This critical stage moves beyond surface aesthetics to protect the home’s structural integrity. It involves creating an impermeable barrier behind walls and under floors, especially in wet areas like showers and around tubs, to prevent water intrusion, which can lead to costly structural damage, rot, and toxic mold growth.
Implementing a Bulletproof System
A comprehensive waterproofing strategy involves multiple layers of defense. It begins with installing appropriate backer boards and vapor barriers and extends to the application of specialized membranes. Modern systems, like the sheet-applied Schluter-KERDI membrane or liquid-applied products like RedGard, create a continuous, sealed envelope that directs all water toward the drain. This process requires meticulous attention to detail, particularly at seams, corners, and fixture penetrations, where vulnerabilities are most common.
Effective moisture management also requires a robust ventilation plan to handle airborne humidity. Your plan should address:
- Shower Systems: Using integrated, pre-sloped shower pans and bonded waterproofing membranes ensures a seamless and leak-proof installation from the drain up.
- Membrane Application: Whether using sheets or liquid, ensure complete and uniform coverage according to manufacturer specifications. Multiple coats are often required for liquid products.
- Ventilation: Installing a high-capacity exhaust fan, sized appropriately for the room (a minimum of 1 CFM per square foot), is essential. Models with humidity sensors offer automated moisture control.
- Testing: A crucial final step is conducting a flood test on the shower pan for at least 24 hours before any tile is set. This verifies the integrity of the waterproofing and prevents catastrophic failures later.
This detailed approach ensures that the beauty of your new bathroom is protected by a sound, professionally executed system hidden beneath the surface. For a visual demonstration of applying a modern waterproofing system, the video below offers expert guidance.https://www.youtube.com/embed/bfvjEF5Kmas
By prioritizing these technical steps, you safeguard your investment and ensure the longevity and health of your home, making waterproofing a foundational pillar of a successful renovation.
7. Flooring Installation
Selecting and installing the right flooring is a pivotal step in the bathroom renovation checklist, directly impacting the room’s safety, durability, and aesthetic. Bathroom floors must withstand constant moisture, humidity, and foot traffic while complementing the overall design vision. The choice of material and the quality of its installation will define the foundation of your new space, making it a critical decision that balances practicality with luxury.
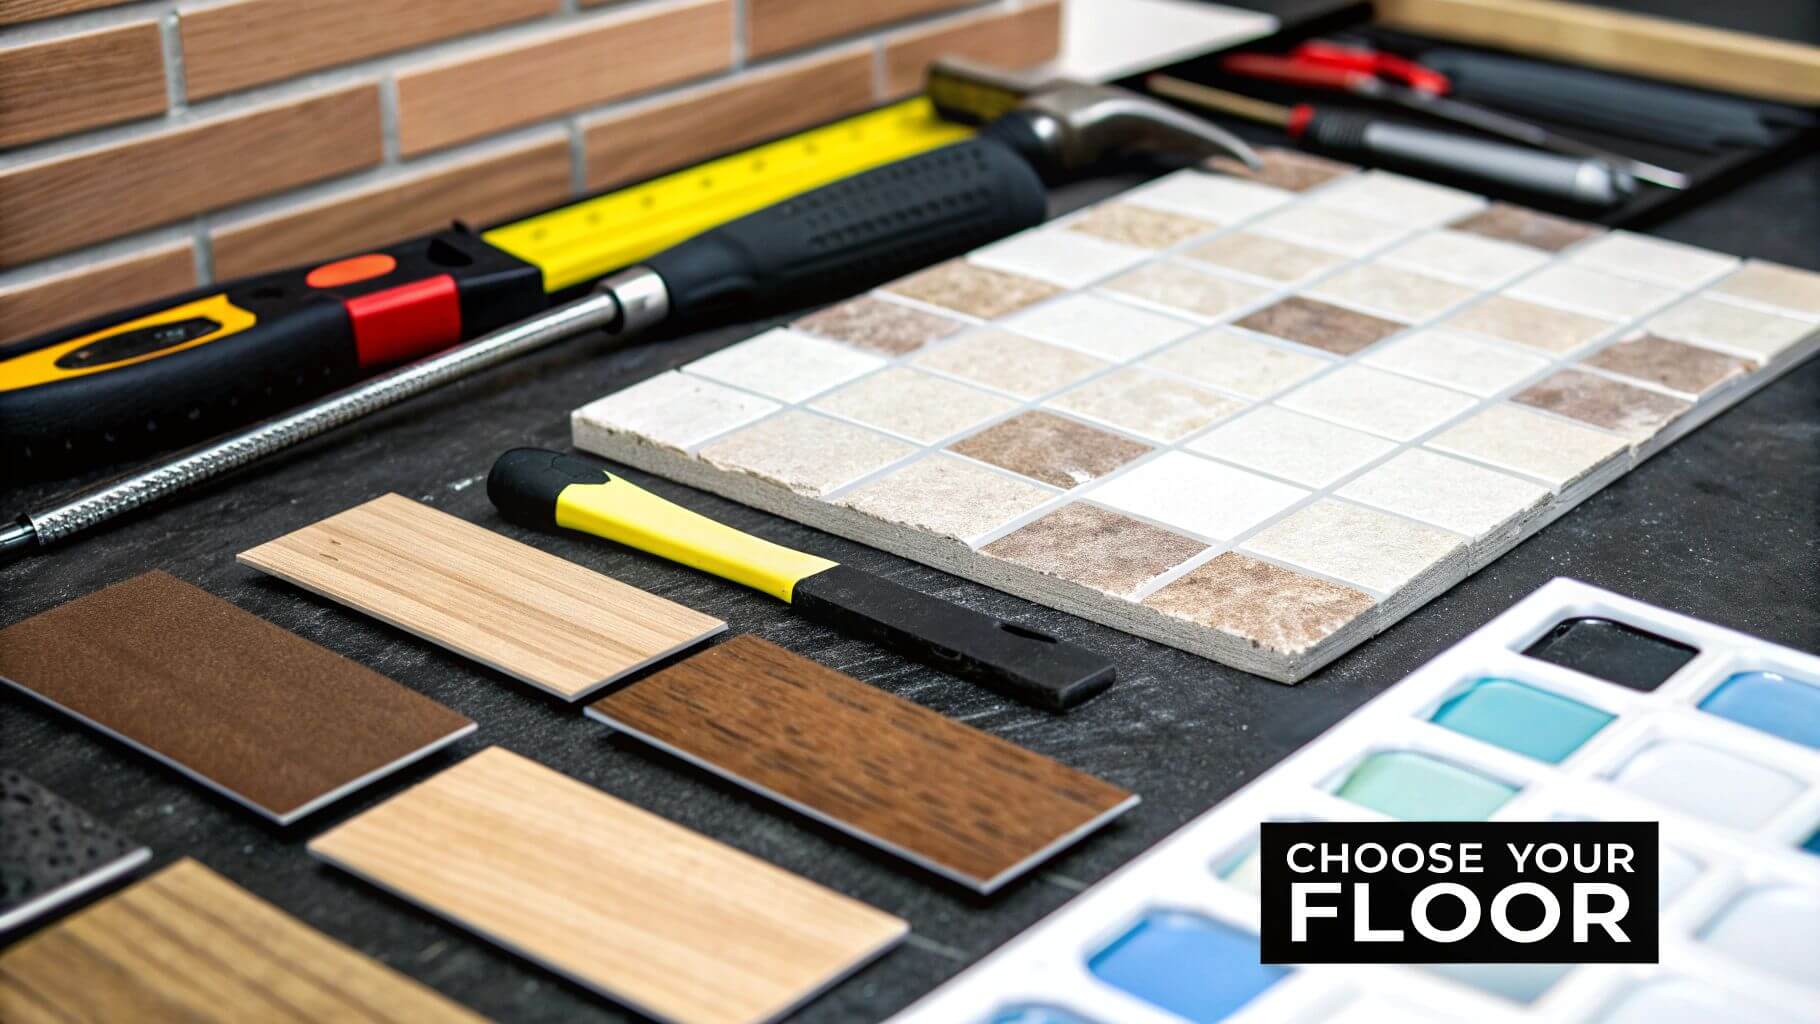
Choosing High-Performance Materials
The material you select sets the tone for the entire bathroom. For a luxurious feel, natural stone like marble or travertine offers timeless elegance, though it requires sealing and maintenance. Porcelain tile is a highly versatile and durable option, available in finishes that convincingly mimic natural stone or wood, providing aesthetic flexibility without compromising on water resistance. For a more modern and budget-conscious approach, innovations from brands like Shaw Floors have made luxury vinyl plank (LVP) a popular choice, offering excellent water resistance and comfort underfoot.
For ultimate comfort, especially in colder climates, integrating a radiant heating system is a must. Systems from manufacturers like Schluter can be installed directly beneath the tile, transforming a cold floor into a source of gentle, consistent warmth. Your material selection must consider both the desired look and the practical demands of a wet environment.
To make an informed decision, consider these key aspects of bathroom flooring:
- Slip Resistance: Prioritize materials with a high coefficient of friction (COF) rating to prevent accidents on wet surfaces.
- Substrate Preparation: A successful installation depends on a perfectly level, clean, and stable subfloor. This non-negotiable step prevents cracking and future damage.
- Maintenance Needs: Be realistic about the upkeep. Natural stone requires regular sealing, while porcelain and LVP are much lower maintenance.
- Radiant Heating: If you desire heated floors, this system must be installed and tested before the final flooring is laid.
Proper flooring installation is more than just laying down tiles; it’s about creating a safe, durable, and beautiful foundation that will support your luxury bathroom for years to come.
8. Wall Finishes and Tiling
Selecting the right wall finishes is a critical step in a bathroom renovation checklist, as these surfaces must expertly balance sophisticated aesthetics with high-performance moisture resistance. The walls set the visual tone for the entire space, defining its style and character. Whether you opt for classic tile, durable paint, or a luxurious accent wall, the chosen materials must withstand humidity and frequent cleaning while contributing to a cohesive design vision.
Understanding Material Functionality and Style
Your wall finish selection goes beyond color and texture; it’s a decision about long-term durability and maintenance. For wet areas like showers and tub surrounds, non-porous materials like porcelain, ceramic, or glass tile are essential. In drier zones, high-quality, moisture-resistant paint or specialty wall coverings can introduce color and pattern. A popular high-end strategy involves mixing materials, such as combining large-format porcelain tiles with a striking natural stone accent wall behind the vanity to create a focal point.
Consider these material choices for your project:
- Tile: From classic subway tile with contrasting grout to modern, large-format tiles that create a seamless appearance, tile offers endless design versatility and superior water protection.
- Natural Stone: Marble, travertine, or slate can be used for accent walls, lending an organic, spa-like feel to the space. Proper sealing is non-negotiable for longevity.
- Paint: Opt for premium semi-gloss or satin finishes specifically formulated for bathrooms, which contain mildew-inhibiting agents to prevent mold growth.
- Waterproof Wall Panels: An alternative to tile, these large-scale panels offer a grout-free, seamless look that is modern and easy to maintain.
This step is where your bathroom’s personality truly emerges. Thoughtful planning of tile layouts to minimize awkward cuts and strategic use of accent materials will elevate the final result from standard to stunning. For inspiration on how leading designers approach these material combinations, you can explore the portfolios of top-tier kitchen and bath designers to see how they masterfully blend form and function in luxury spaces.
9. Final Inspection and Quality Assurance
The final inspection and quality assurance phase is the critical concluding step in your bathroom renovation checklist, transitioning the project from a construction site back into a functional, finished space. This meticulous review ensures every component, from plumbing to paint, meets the highest standards of craftsmanship, safety, and your personal expectations. It is the final opportunity to identify and rectify any deficiencies before signing off and making the final payment.
A Systematic Approach to Completion
A successful final inspection is not a quick glance but a systematic and comprehensive process. It involves moving beyond the initial visual appeal to test the functionality and durability of every new installation. This is where you create a detailed “punch list,” an itemized list of all tasks that need correction or completion. This list becomes the official record for your contractor to address before the project is considered complete.
This systematic review should cover several key areas:
- Functional Testing: This involves running every system to confirm it operates correctly. Check for plumbing leaks, test water pressure and temperature in the shower and sinks, and ensure proper toilet flushing and draining.
- Aesthetic Review: Scrutinize all finished surfaces. Look for chips in the tile, uneven grout lines, paint smudges, or scratches on fixtures and cabinetry. Ensure all elements align perfectly and hardware is installed securely.
- Code Compliance: The final municipal inspection is a non-negotiable step. The inspector will verify that all plumbing, electrical, and structural work complies with local building codes, ensuring the safety and legality of your renovation.
- Documentation Handover: A professional contractor will provide you with all warranties, user manuals, and maintenance guidelines for the new fixtures and materials.
This final quality check guarantees that the finished bathroom is not only beautiful but also fully functional and built to last. It provides peace of mind, confirming that your significant investment has resulted in a high-quality space that adheres to both your vision and industry standards.
Bathroom Renovation Checklist: 9 Key Steps Comparison
| Item | Implementation Complexity (🔄) | Resource Requirements (🔄⚡) | Expected Outcomes (⭐📊) | Ideal Use Cases (💡) | Key Advantages (⭐💡) |
|---|---|---|---|---|---|
| Set Budget and Timeline | Medium: Requires detailed research and planning | Moderate: Time for quotes, cost research, spreadsheet tracking | High: Prevents overruns and delays | All renovation projects needing financial control | Clear expectations; informed decision-making |
| Design and Layout Planning | Medium-High: Requires design skills or software | Moderate-High: Design tools or professional services | High: Optimized layouts and aesthetic appeal | Custom, complex, or style-focused renovations | Visualizes outcome; identifies problems early |
| Obtain Necessary Permits | Moderate: Bureaucratic process, documentation | Low-Moderate: Time and fees; coordination with authorities | High: Legal compliance, insurance validity | Projects with electrical/plumbing/structural changes | Ensures safety; prevents costly corrections |
| Hire Qualified Contractors | Medium: Vetting, interviewing, and negotiating | Moderate: Cost of professionals; communication effort | High: Quality workmanship and reliability | All but DIY projects | Licensed expertise; liability and insurance coverage |
| Address Plumbing and Electrical Systems | High: Complex, requires licensed pros | High: Specialized labor, potential extra work | Very High: Safety, value, future-proofing | Major renovations involving utilities | Ensures code compliance; improves functionality |
| Waterproofing and Moisture Control | Medium: Specialized installation required | Moderate-High: Quality materials and expertise | Very High: Prevents damage and mold | Wet areas like showers, tubs, and walls | Protects structure and health; extends material life |
| Flooring Installation | Medium-High: Varies by material and skill | Moderate-High: Material cost and skilled labor | High: Aesthetic and functional flooring | All renovations focusing on floor durability and design | Enhances aesthetics; improves safety and comfort |
| Wall Finishes and Tiling | Medium-High: Skilled tile installation and painting | Moderate: Materials plus labor | High: Moisture protection and visual impact | Surfaces exposed to moisture and design emphasis | Protects walls; personalizes space |
| Final Inspection and Quality Assurance | Medium: Detailed, requires coordination | Low-Moderate: Time for inspection and fixes | High: Ensures quality and compliance | End-stage of any renovation | Validates work; provides documentation and confidence |
Final Thoughts
Embarking on a luxury bathroom renovation is a significant undertaking, one that blends ambitious design aspirations with meticulous, practical execution. This comprehensive bathroom renovation checklist has guided you through the entire journey, from the foundational steps of budgeting and conceptual design to the critical technical phases of construction and the final, satisfying flourishes. By dissecting the process into these manageable, sequential stages, the once-daunting project becomes an achievable and rewarding endeavor.
The true success of a high-end renovation lies not just in the final aesthetic but in the quality of the work hidden behind the walls and beneath the floors. It’s about ensuring the project’s longevity, functionality, and safety. This is why our checklist placed such a strong emphasis on the non-negotiable elements: securing the right permits, engaging vetted professionals, and meticulously addressing the core infrastructure of plumbing, electrical, and waterproofing systems. These are the pillars upon which a truly luxurious and enduring space is built.
Key Takeaways for Your Renovation Journey
As you move from planning to action, keep these core principles at the forefront of your project management strategy. They represent the distilled wisdom from countless successful high-end renovations.
- Planning is Paramount: The most common and costly mistakes are born from insufficient planning. Your initial investment in detailed design, precise budgeting, and realistic timeline creation will pay dividends by preventing expensive changes and delays down the line. A detailed plan is your project’s North Star.
- Professional Expertise is Non-Negotiable: The allure of cutting costs by hiring less experienced contractors can be tempting, but it is a false economy. The expertise of a licensed general contractor, a certified plumber, and a qualified electrician ensures compliance, safety, and a superior quality of finish. Their involvement protects your investment and your home.
- Functionality Precedes Form: While the selection of exquisite tiles and statement fixtures is exciting, these choices must be supported by a flawlessly functional layout and robust infrastructure. Never sacrifice the quality of waterproofing, the integrity of the plumbing, or the safety of the electrical system for a purely aesthetic choice. The most beautiful bathroom is one that works perfectly and is built to last.
Your Actionable Next Steps
With this detailed bathroom renovation checklist in hand, your path forward is clear. Begin by solidifying your vision and defining the scope of your project. Start gathering inspiration, but quickly transition into the practicalities of creating a floor plan and setting a firm budget. Use this checklist as your interactive guide, revisiting each section as you progress through the phases.
Engage with potential designers and contractors early in the process. Their professional insights during the planning stage can refine your ideas and identify potential challenges before they become problems. Remember, this project is a collaboration between your vision and their expertise. By systematically addressing each item on this list, from permits to the final punch list, you transform a complex process into a structured, manageable, and ultimately successful venture, creating a sanctuary that elevates your home and your daily life.
Ready to bring your vision to life with the industry’s top talent? The Haute Design network connects you with a curated directory of premier interior designers, architects, and builders who specialize in luxury renovations. Find the perfect professional to execute every detail of your bathroom renovation checklist by exploring the exclusive network at Haute Design.